Instructions for Use
PLEASE READ ALL OF THE WRITTEN INSTRUCTIONS BELOW BEFORE USING YOUR WINDSHIELD WOW!
PLEASE DO NOT SIMPLY WATCH THE FIRST TIME USE VIDEO!
THE WRITTEN INSTRUCTIONS EXPLAIN HOW TO ENSURE THE PADDLES DONT FALL OFF WHEN IN USE AND HOW TO GET STREAK FREE RESULTS. FAILURE TO READ THESE INSTRUCTIONS WILL LEAD TO PADDLES FALLING OFF REPEATEDLY AND IMPERFECT RESULTS.
THE FIRST TIME USE VIDEO IS INTENDED AS A QUICK GUIDE ONLY! READ ALL OF THE INSTRUCTIONS BELOW!!!
CONSULT OUR TROUBLESHOOTING GUIDE FOR ANY PROBLEMS YOU ENCOUNTER WHEN USING YOUR WINDSHIELDWOW.
First Time Use Video
(Quick guide only!!! You must Read all instructions below!!)
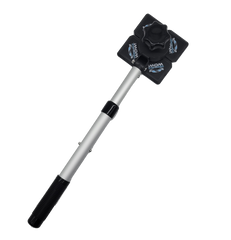
Step 1. Installing Your Extension Arm*


1. First, remove the vinyl cover cap from the external paddle of your Windshield WOW! by twisting and pulling upward at the same time!

2. Next, place your extension arm with the hinge head flat onto the top of the external paddle’s knob with the STEEL PIN DOWN! Place the steel pin into one of the four smaller holes, as seen marked below:

Note the CORRECT and INCORRECT orientations of the steel pin:


3. Now, install the threaded knob into the center hole and screw it into the threaded insert in the center of the paddle’s hand knob. Hand tighten.
(Note: The first time screwing the threaded knob into the center hole you may encounter some resistance just before the knob is seated all the way down. You may need to screw it really hard this first time. This is because there may be a small burr on the end of the threads from the assembly process. This is normal. Screw the knob really hard the first time past this burr and this will break thru the burr and it will be easy from hence forth--we promise!).

The below picture is the correct installation of the extension arm:
Note the RIGHT and WRONG installation below. Notice the hinge action is low and near the magnetic paddle.


Notice the difference? On the right, the hinge head is on upside down! The hinge action is high above the integral paddle knob. This will result in the paddle falling off all the time when you push it with the extension arm. And the metal hinge piece could contact the windshield and cause scratches if you accidentally flip it off the windshield and onto its side. DO NOT DO THIS!!! This can not happen if you install it properly. We are not responsible for any damage that is caused by improper installation of the extension arm.
Step 2. Properly Using the Windshield WOW!:
Note: Never clean your windshield glass in the direct sun. Always seek a shaded, cool area. A hot windshield will make the cleaning solution evaporate too fast and fail to clean properly.
Staging your Windshield WOW!:

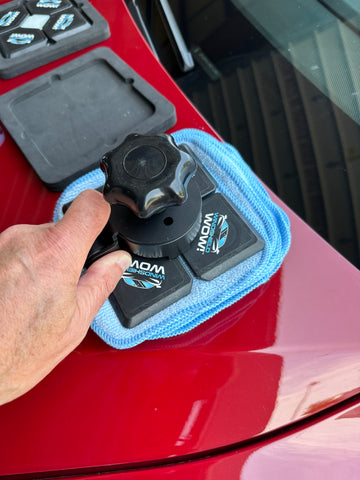
We recommend staging the components conveniently on your vehicle hood as shown above. Use the black foam paddle storage trays to set the paddles on the hood. Place a stack of blue micro-fiber cloths and the gray finish buffing cloths on the hood as well.
WARNING: BEFORE USE, INSPECT YOUR WINDSHIELDWOW MAGENTIC PADDLES (THE WHITE VELCRO PADS) AND ENSURE THEY ARE FREE FROM ANY FOREIGN DEBRIS. IF YOU DROP THESE PADDLES ON THE GROUND OR ON THE FLOOR BOARDS OF YOUR CAR THEY MAY ATTRACT METAL DEBRIS OR OTHER FOREIGN DEBRIS THAT CAN CAUSE SCRATCHING OF YOUR WINDSHIELD GLASS. CLEAN ANY DEBRIS FROM THE VELCRO PADS WITH A TOOTHBRUSH. SIMILARLY, ENSURE THE MICROFIBER CLOTHS ARE ALSO FREE FROM DEBRIS BEFORE USE.
NEVER EVER REUSE A MICROFIBER CLOTH THAT HAS TOUCHED THE GROUND UNTIL THOROUGHLY WASHED AND CLEANED! MICROFIBER CLOTHS THAT HAVE FALLEN ON THE GROUND CAN COLLECT DEBRIS THAT CAN SCRATCH YOUR WINDSHIELD!
You can place a can of Sprayway foam glass cleaner safely on the hood using the Silicone Scuff Guard stretched over the bottom of the can so it can be in easy reach when you need it.
Attach Microfiber Cloth to Both Paddles


Now, Spray the External and Internal Paddles:

Next, spray the paddles thoroughly with your glass cleaner.
Set External Paddle:

Next, set the external paddle on the outside of your windshield. make sure it is close to your open car door window.
Install by Aligning Internal Paddle with the External Paddle:

Reach in through the open car door window and place the inside paddle onto the location of where the external paddle is sitting and attach the paddles together. Don't worry, the inside paddle will jump to the external paddle but it wont harm the windshield.
Spray Windshield with Cleaner:

Spray glass cleaner around the external paddle and internal paddle liberally. Yes, reach in the open door window and spray some glass cleaner around the inside paddle too.
Push and Pull Until Clean (Extension Arm optional)

Thoroughly wet clean your windshield until the blue micro-fiber cloths come off totally clean. You can stop and turn the cloths around to use both sides, and replace with new ones if need be.
Make sure you keep the external paddle from encroaching into the black glass border around your outside windshield--this is where hard dash, side pillars and mirror mount reside on the inside and will make the inside paddle fly off.
WARNING: IF YOU MAKE THE PADDLES FALL OFF DURING USE (BY HITTING INTO THE DASH, SIDE PILLARS OR MIRROR MOUNT), ENSURE THE MICROFIBER CLOTHS ARE REPLACED AS THEY MAY HAVE ATTRACTED FOREIGN DEBRIS AFTER LANDING ON THE GROUND OR IN YOUR VEHICLE.
NOTE: Avoid sudden movements or super rapid changes in direction of the external paddle as these tend to separate the paddles as the internal paddle doesnt have time to keep up with the external paddle. Moving at a good pace is fine, however, sudden changes in direction or starting rapidly from a stopped condition tends to lead to paddle separation. Make smooth movements and transitions of directions!
Don't get discouraged if the inside paddle falls off--it takes a few times to get the hang of staying out of the black glass border of your windshield! Stay out of this border area and the inside paddle wont ever fall off unless you want to remove it.
If you find it too hard to push or pull the external paddle:
1. Use more glass cleaner and make sure you're using SprayWay foam brand. It makes the paddles glide easily.
2. Try pushing/pulling quicker. That breaks the friction easier.
3. If all else fails, you can purchase a set of reducer pads from us that reduce the pull strength. (Or ask us and we will send a set free!)
Finish Buff Your Windshield When Wet Cleaning is Complete

When you have thoroughly wet cleaned your entire windshield with the blue microfiber cloths, remove the blue cloths and install a Wow Finish Buffing Cloth to each paddle (attach the velcro side of paddle to fuzzy side of Finish Buffing Cloth). Reattach paddles to windshield just like you did earlier.
(NOTE: As an alternative to using the Wow Finish Buffing Cloth for finish buffing, you can use a paper towel instead. See Alternate Finish Buffing with Paper Towel below on how to adhere a paper towel square. Paper towel finish buffing may be more effective for first time users)
Perform Finish Buffing:

Perform finish buffing with the windshield DRY. Continue this dry buffing back and forth until no more streaks are visible. If you performed an adequate wet cleaning, dry finish buffing is all that is needed to obtain streak free results.
NOTE: A fine mist (use sparingly) of finish buffing spray (we may have included a small bottle as part of your kit) can be beneficial in performing your finish buffing step if completely dry buffing isn't getting all the streaks out. Only use this mist sparingly. Over saturating the finish buffing cloth can lead to poor finish buffing performance. If you do not have finish buffing spray you can use Isopropyl alcohol or even a very light mist of you glass cleaner. Again, do not over saturate the cloth. Only a slight mist is needed.
Streaks or smudges left behind after the dry finish buffing step generally means you have not performed the wet cleaning step adequately and there are still oils and or grime still on the windshield. Consider repeating the wet cleaning step again. For windshields that have rarely or never been well cleaned before we have found that a a few drops of Dawn dish detergent in a spray bottle of water makes a great degreasing cleaner for your windshield. Try this and then follow with the normal wet cleaning with glass cleaner and finally with the dry finish buffing.
Alternative Paper Towel Finish Buffing Method:
Attach paper towel square to the external paddle:

To attach the paper towel square to the paddle, first apply a clean, dry blue micro-fiber cloth onto the external paddle and then press the paddle onto a stack of 1/4 sheet (Brawny Tear-A-Square) paper towels which will cause a paper towel to adhere to the blue micro-fiber cloth. DO NOT SPRAY ANY CLEANER ONTO THE PAPER TOWEL. KEEP IT DRY.
NOTE: A fine mist (use sparingly) of finish buffing spray (we may have included a small bottle as part of your kit) can be beneficial in performing your finish buffing step if completely dry buffing isn't getting all the streaks out. Only use this mist sparingly. Over saturating the finish buffing cloth can lead to poor finish buffing performance. If you do not have finish buffing spray you can use Isopropyl alcohol or even a very light mist of you glass cleaner. Again, do not over saturate the cloth. Only a slight mist is needed.
Streaks or smudges left behind after the dry finish buffing step generally means you have not performed the wet cleaning step adequately and there are still oils and or grime still on the windshield. Consider repeating the wet cleaning step again. For windshields that have rarely or never been well cleaned before we have found that a a few drops of Dawn dish detergent in a spray bottle of water makes a great degreasing cleaner for your windshield. Try this and then follow with the normal wet cleaning with glass cleaner and finally with the dry finish buffing.
Set External Paddle on outside of Windshield

Attach paper towel square to the inside paddle:

Attach a paper towel square to the blue micro fiber clothed internal paddle in the same manner as you did the external paddle.
Install the paddles to the windshield.
Once the paddles with the paper towel squares are installed, dry finish buff until there are no streaks and smudges. The paper towel squares will stay adhered to the blue microfiber cloths as long as they remain dry. Avoid using any misting of alcohol, as dry finish buffing shouldn't need any.
Pre-cut paper towel squares optional for purchase here.
NOTE: The finish buffing step should be performed dry, after your windshield has been thoroughly wet cleaned as per above. Streaks or smudges left behind generally means your wet cleaning failed to remove all the oils from your windshield. Reperform another wet cleaning. We find that doing a degreasing wet cleaning with a mixture of dawn dish soap and water works great at degreasing the windshield. Then follow up with normal wet cleaning with glass cleaner followed by a thorough dry finish buffing as per above.
How to Ensure you Get Streak Free Results
